You are currently browsing the category archive for the ‘cutworms’ category.
Remember the bok choy seeds that I started back in March? Here’s what they looked like yesterday, right before I planted them in my garden bed.
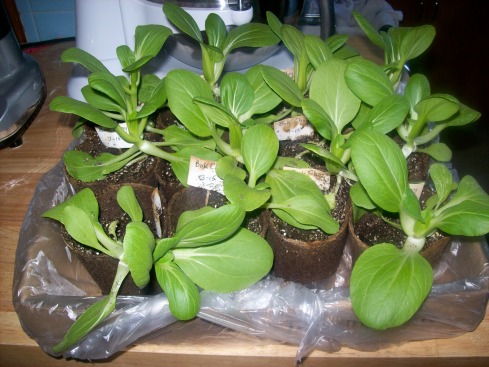
I started planting my rows of brassicas — broccoli, cauliflower, Brussel sprouts, cabbage, kohlrabi, and now the bok choy — once our April night time temperatures were pretty reliably above thirty-five degrees. Now, these cabbage relatives, also sometimes called crucifers, are pretty tolerant of cool temperatures, and even hold their own well against light frosts, especially when planted, as I have done, in a somewhat protected plot of soil (I have them on the south side of my garage).
Additionally, I have covered each seedling with one of my improvised two-liter bottle cloches, which not only gives them cover from the frost, but also insects, such as the dreaded cabbage worm. As they outgrow the cloches, I will put them under floating row covers for the rest of their growing season.
Another enemy of my garden seedlings are cutworms, which gave my poor peas duress last year. As I’ve been readying the soil (I work a double row at a time), moving from east to west, I found no evidence of cutworms in that the section of the garden where my fall leaves had covered the soil. However, the section with little leaf cover seemed to have many cutworms buried in the soil. So I have begun to use additional protective measures in this area of the garden. All winter long I have been saving my empty oatmeal boxes for this very purpose. I cut each box in half, and when I use the smaller, 18-ounce boxes, the two-liter bottle cloches fit nicely over them.

I planted each seedling inside the protective collars offered by the oatmeal boxes, and then, covering them with the bottle-cloches, I anchored the cloches in place by submersing about an inch of the plastic beneath the soil and piling up additional soil around the outside of the bottle. There was room for all twelve of my bok choy seedlings in the double row that I prepared for them. I normally have back up seedlings, in case of some gardening disaster (such as an unexpected hard freeze), but in the case of my bok choy, I have none, which is why I saved them for planting outside last.
We had heavy rains last night, and the forecast is for rain all day today as well. My little bok choy seedlings appear quite content in their new location. And I’m grateful for a rainy day, because it means I can rest up a bit from all of the binge-gardening I’ve been doing this week.

Last frost date in my region is May 15. That is a date locked into the DNA of all serious gardeners. This is when we can safely sow our seeds and our tender seedlings outside, into the garden beds that we have lovingly prepared for them.
My sun porch is anxiously waiting for that date. Ten more days. My tomatoes are waiting as well. As we get closer to May 15, I’ll be checking weather forecasts to see if I might fudge a little and set them free a few days early. But ten days . . . that’s a little risky.

Tomatoes are the primary seedlings in my sun porch, waiting for planting in the next week to ten days.
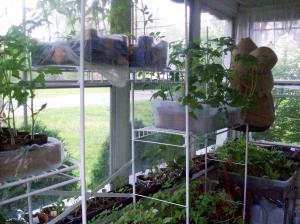
Last spring we actually had frost in late May, so this year I’m a little worried about rushing my plants outside too fast. I always start twice as many seedlings as I actually need, so that I have back-ups in place in case the worst happens. But these tomatoes, the ones I started in late February, have gotten large very quickly. I don’t know how long I can hold them back without causing them distress. I expect many of them will find homes in buckets and other large containers as I wait to see whether or not I should be giving them away to family and friends. And I’ve purchased row covers to use in the early weeks outside as another precaution for my tomato crop.
Thankfully, I have nearly finished putting in my very ambitious brassica garden. I saved my old station wagon, retired last year, to use as a green house this year, and it performed admirably.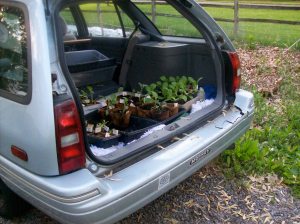 At one point I had more than a dozen large flats of brassica and lettuce and greens seedlings growing enthusiastically inside this defunct 1993 Mercury station wagon, awaiting transplantation into the garden. Except for the bok choy and my back ups, everything is outside now. Among my brassicas, I have hearty plantings of broccoli, cauliflower, kohlrabi, cabbage and Brussel sprouts, all under cover, not only protected from the cold, but also those dreaded cabbage worms that I found so discouraging last year. The floating row covers will stay in place for the entire season, right up until this spring planting is ready for harvest.
I can’t believe I once thought a garden starts in May. This year, my garden began in the middle of January, when I bought the seeds and started planting my seedlings, starting first with the herbs, which need the most time to get established. Then came the tomatoes, then the lettuces and greens, and finally, in March, the brassicas. Last, I began planting the marigolds and nasturtium, the flowers that will help protect my garden from pesky insect infestations. And, in early April, the cold-tolerant greens began moving out to the garden and I planted my peas. In late April, the brassica seedlings were added.
Now we wait for May 15.
Peas are the first seeds that I have planted into my garden soil this season. I got only a small taste of these sweet morsels last summer, leaving me with a huge appetite for more this year.
Last year, my very first year as a vegetable gardener, my spring peas took an awful hit when cutworms came along and in one night wiped out a sizable portion of the crop. Well, you expect to learn a few things the first time you do something new, and I vowed while they got my peas then, they would never get them again. Hah! I have been saving up egg shells for the solid past year and now I am arming my peas with crushed eggshells, which (I’ve read) will cut up those little cutworms who try to break through their barrier. Let those cutworms try. We are ready.
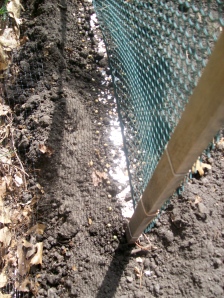
I’m planting my peas a little later this year as well. I’m hoping the cutworms — if there are any hanging out in our neighborhood — will take the rampage elsewhere by the time my little peas sprout and grow.
This is a household of women, and I look for ways to use lightweight material for heavy-duty tasks. My trellises are constructed with 12-foot lengths of vinyl fencing tied to three 4-foot pine stakes. These are easy for a one-woman army, without any assistance, to lift and hammer each into the ground. I tried nailing the fencing last year for a fall planting of peas, but with my arthritic hands, that took more time and effort — and caused more pain — than I was prepared to give this year. So, sisal ties became my cheap and easy alternative.
I soak my pea seeds overnight before planting to get the sprouting process underway, and then I sprinkle my seeds with soil inoculant before planting the seeds. After double spading a 2-foot wide by 12-foot long stretch of ground, raking and then, using a hoe, plowing a 4-inch wide trench the full length of the row, I hammer the trellises into place first before planting my seeds about 2 inches apart on each side of the trellis. The egg shells are sprinkled into the ground with the pea seeds, and then I, again using my hoe, push soil over the seeds. Another sprinkling of egg shell pieces cover the entire top.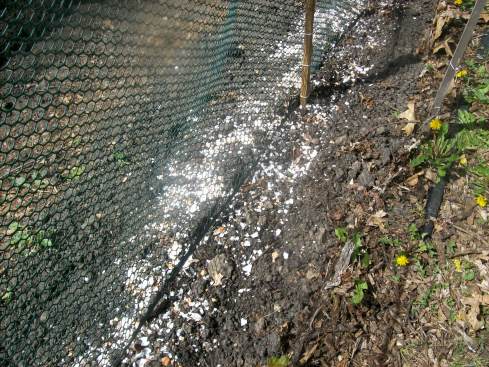
Finally, I support the each end of my trellises by tying them to my fence and a nearby tree to pull the vinyl fencing taut. These ties will stay in place throughout the entire pea growing season. I learned from last year, also, that it’s better if I put in my trellis before planting the seeds, as I’m pretty clumsy and tend to kill off a plant or two if I attempt to do this later on. (Oh, the things you learn from your garden.)
I’m planting a large crop — two double rows of sugar snap peas and two double rows of shelling peas. We love peas in this family, and I want to grow enough to keep us going through the next twelve months. I’ve selected my back garden plot for my peas this year, which gets full morning sun but has high shade in the afternoon hours. This is where I grew my lettuce bed last year, and I expect that I’ll rotate these two crops yearly. For both lettuce and peas, I can get in a spring and a fall harvest, given that both crops are relatively tolerant of cool spring and fall temperatures, as long as we don’t have a hard freeze. If I can finish planting these four double rows of peas quickly, I’ll also add another row of snow peas. In my family, those likely will be eaten as fast as they grow, and we’ll have little available for freezing.
The irony of writing a blog about gardening is that when there is the most activity going on in the actual garden, the blog suffers from lack of attention. The past three weeks have been hectic and back-breaking, as I made the push to get as much of my garden planted as early as possible once the last frost day (May 15) had passed.
I started a few days before the actual last frost date, on May 12, as there was no forecast of frost for the days ahead. First, I planted the eight 2-inch tall filet bean bush-style plants (Haricot Verts, Plantation Products) that I had started the month before in a flat on my sun porch. The flat was a little experiment to see if I could get an earlier harvest for a row of beans, which are a family favorite. I was not able to get any other beans planted until May 23, so I have to conclude that the experiment seems to have paid off. I now have one row of foot-tall bean plants while the others are only today sprouting out of the soil and into the world.
After putting in that first row of filet beans, I next planted two rows of broccoli plants (Barbados Hybrid, Ferry-Morse Seed Co.) that I had started in flats about the same time as the beans. Later in the week I had to be away for four days. In my absence, marked by an unusual late frost the first night (May 18th) followed by four days of hot sunshine and no rain, all but one of those infant broccoli plants shriveled up and died. Did the frost kill them? Or was it the lack of rain? Maybe cutworms were the culprits. Who knows? But thankfully, I had another flat of broccoli that I had planned to put in upon my return on the 22nd, and those filled the gaps left behind by their dead siblings. (One thing that I have learned up front about gardening is that it pays to have lots of back-up plants ready and waiting should something else prove to fail.)
Also planted that first week were four hills of patty pan squash, three rows of zucchini (Burpee’s Fordhook Zucchini, W. Atlee Burpee & Co.), three rows of yellow squash (Early Prolific Straightneck, W. Atlee Burpee & Co.), and two rows of carrots (Petite ‘n Sweet, W. Atlee Burpee & Co.). It doesn’t sound like much for six days of planting, but keep in mind that we rototilled the garden plot way back in March, and in the time since weeds have taken over the tilled soil. Additionally, given my experience with the peas, I was on a careful lookout for cutworms as I turned over the soil once again to ready it for planting. You might be interested to know that I averaged about one cutworm per spade full of soil. (I threw the round larvae out onto the driveway for the birds to eat. I made an abundance of feathered friends during the course of the week, to be sure.)
Additionally, I have radishes everywhere. I planted an entire package, putting in a few seeds into every row between the various squashes. One thing I remember watching my grandmother garden when I was a child is that she always alternated ever seed with a radish seed. The radishes sprout first — here in three or four days — and are ready to eat after three to four weeks. (Which is right now, in case you are curious.) So, while I am waiting for the rest of the seeds to sprout and then grow, I can pull out the ready-to-harvest radishes to make room for them. This summer, I will eat many radishes in memory of my Grandma Benson.

Old and regrettably damaged photo of Grandma Benson holding baby me
Here I have to point out another fact that I have learned this year as a novice gardener. Digging in the garden is a real pain in the butt. Literally. With exercise like this, who needs a gym? I may not have the perfect figure, but this summer I have glutes to die for. Women half my age should be so lucky.
When I resumed planting in my garden on May 23rd, returning after a five-day absence, I planted four hills of cucumbers (two of Early Pride Hybrid and two of Lemon, both from W. Atlee Burpee & Co.) 30 pole bean seeds (Kentucky Wonder, W. Atlee & Co.), and another 15 filet beans. Then, in a new plot along the sunny side of our house, I turned over the sod and put in sunflowers and four o’clocks (all now sprouting) against the house and in front of these 39 Roma tomatoes plants that I started from seed and grew on my sun porch. In front of the tomatoes are six hills of pumpkins just sprouting today (Jack-O’-Lantern, W. Atlee Burpee & Co.). For those who care to know, that’s 30 pumpkin seeds, a full 4-gram package.
And, if that isn’t enough, I put another 18 tomatoes in the back garden plot with the lettuce and baby spinach. Additionally, I have planted the excess 50-plus tomato plants (the back-ups) in every container I could find, and what I don’t use I’ll soon give away to family, friends and just about anyone else who will take them. And, yes, all of these are Roma tomatoes, every single one of them. We aren’t big for fresh tomatoes in this family, but we do like tomato sauce, and hopefully I’ll be putting away plenty of tomato sauce for the winter. Okay, admittedly I went a little overboard on the tomatoes, but like I said earlier, the one gardening rule I have learned to count on is to have plenty of back-ups.
I still have a 10 by 15 foot plot left to turn over on the far east side of my large garden plot. This section of my garden only gets direct sun after about 1:30 p.m., so I haven’t entirely decided what I should plant here. I have a 12-foot row of peas doing very nicely along one end, so this may be where I put in my fall crop of peas. I have plenty of baby spinach and lettuce seeds left also, and given that the soil in this section is a little rooty due to large trees a little bit away on the east and south, this site might be best dedicated to more greens. I’ll gladly take suggestions from anyone who can offer some.
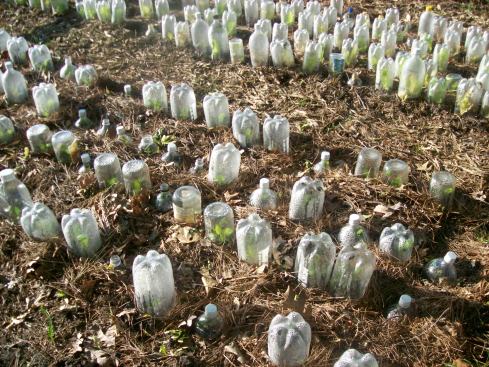
They aren't pretty, but they get the job done.
Several of my readers have commented on my cloches, made on-the-cheap from various bottles that largely have come from my household. By and large, these are one- and two-liter soda bottles. We had an entire winter’s supply of plastic bottles in our garage, awaiting recycling, when the idea came to me that I might be able to use them in my garden.
(Actually, if truth be told, we really don’t drink that much soda from bottles. I, however, love seltzer water, which I buy in two-liter bottles, and average about one bottle a day, whereas my daughters are fans of Walmart’s flavored seltzer, which comes in one-liter bottles. Between the two of them, they probably average eight to ten bottles a week. Yes, that’s a lot of plastic, but our water here is very bad quality, and even purifying it doesn’t seem to remove the bad flavor.)
Initially, I cut the bottles roughly about one-third down from the top of the cap. Two-liter bottles are 12-inches tall, and using a utility knife I cut the bottles at the point where the label ends, somewhere between 7-1/2 and 8 inches from the bottom. I cut the 10-inch tall one-liter bottles in about the same place, two-thirds up from the bottom, along the edge of the label. Then I’d remove the labels and use the bottoms. Later, when I ran out of bottoms, I realized that the tops also could be used with the shorter seedlings.
When I place the bottles over my seedlings, if the surrounding ground is soft, I can push the bottles down into the soil an inch or two, which secures them from toppling or getting blown about in the wind. We have had some windy days, but I have only had a couple of bottles desert their posts. With the fence around the garden — which is really not fencing at all, but deer netting secured to stakes — none have blown away to liter my neighbors’ yards. When I covered the spinach seedlings, which had sprouted in place in their garden setting, I soon learned to loosen the soil surrounding them with my hand spade before attempting to secure the bottles over them. Otherwise, the flimsy plastic of the bottles curls under and the cloches don’t stay in place.
One of the reasons I really like the cloches is that I can pile up the mulch fairly thickly around the plants and close to each individual plant without smothering the seedlings underneath. As the mulch settles into place and weathers down after steady rains, it forms a nice ring around the plants without actually touching the stems. My regular readers may recall that I have been fighting unusually high pH levels in my soil — it measured above 7.5 when we first turned over the soil in March — and after an initial application of aluminum sulfate that brought the pH down to just under 7.0, I have been attempting to maintain and perhaps lower that a bit more with pine needle mulch, graciously provided by my next-door neighbors. The cloches help prevent the needles from actually touching the seedlings, thus avoiding any possible burning from their high acid content.
The cloches also have very nicely protected the plants from rabbits, mice, raccoons, squirrels, ground hogs and all of the other Rodentia that prey from above the soil. Additionally, they had been very effective against the much-despised cutworms that strike from above — that is, of course, until the cloches were removed. They didn’t seem to protect them from underneath though, and the cutworm species that attacks the roots were able to achieve their mayhem unhindered, even with the cloches in place. I’m hoping that I will not have the problem with cutworms in subsequent years as cultivation alone seems to work against them as time goes on.
The two-liter bottles, by virtue of their larger circumference, fit over larger peat pots. I have sprouted my seedlings in 2.5-inch and 1.75-inch biodegradable cells, and the one-liter bottle cloches do not fit around the larger cells. So I have used them on the seedlings in the smaller cells (the lettuce and spinach, for example) and saved the two-liter bottle cloches for the seedlings in the larger cells. My lettuce plants have gotten so large now though that I am transferring the larger cloches to them as they become available. I expect I’ll soon be harvesting some of the lettuce, perhaps within the week.
However, I find I actually prefer the smaller one-liter cloches whenever I can use them. I have found that the flimsy plastic on the larger bottles curls under with age, which makes it harder to push them down into the soil. Loosening up the soil around the small plants first before pushing in the bottles over them helps prevent the curling, but in time the plastic eventually curls anyway. I extend the life of these larger cloches by trimming off an inch of the plastic when it starts to curl, but they will end up in the recycling bin before the season’s end, I’m afraid. The smaller bottles, on the other hand, will likely survive several seasons.
As I’ve needed larger and larger bottles, I started cutting off the bottoms of the bottles instead of the tops. I only take off between an inch and two inches when cutting from the bottle, which gives me a couple of inches more in height. This also is actually a better design functionally for cloches. The plastic at the bottom of soda bottles is a tiny bit thicker, which makes for a sturdier cloche. And the tapered top of the bottle allows debris to slide off easily, optimizing the sun that reaches the plants inside. Additionally, I have the option of removing the bottle cap and watering the seedling inside the bottle without removing the cloche, when I think that not enough moisture is reaching the roots directly under the cloche. This isn’t a frequent problem, though. Being able to mulch up close to the seedling allows the soil to retain moisture much more effectively between rainfalls. And, of course, I water with a soaker hose, so as long as the roots are getting what they need, it doesn’t matter whether or not the surface soil is damp.
I’ve been so happy with my improvised cloches that I’ve started using just about every plastic and glass container that would otherwise head straight to the recycling bin. This is what I’ve learned: I don’t like the gallon-sized milk and water bottles. The plastic in our gallon bottles is milky in color and translucent rather than transparent. I don’t think the seedlings inside get enough light or enough water to best sustain them. I love juice bottles the best, especially the large round Juicy Juice bottles. They are made with a thicker plastic, but are big enough in circumference to fit around larger peat pots. And when the bottoms are cut off, I have the same tapered top and the same option of using them with or without the lids.
Any clear glass or plastic container can be put to use in this way. The only limit is the size of the opening. Smaller jars can be used on tiny first sprouting plants and replaced with larger ones as the plants grow. In time, of course, the plants will outgrow them all, but by that time they will have a more solid footing in this world and be less vulnerable to attack. A loss of one leaf on a large plant is not the potentially fatal blow that it means to a seedling. Roots are larger, stems are sturdier, and leaves are more plentiful on older and larger plants.
It’s been more than a week since my last post.
Those of you who read about the devastation endured (if you didn’t, read this) by my poor peas will understand. Such a blow is an entirely disheartening event for a beginning veggie gardener. And, after all the pride I had taken in my glorious peas, I suddenly felt very much put in my place. Who was I to think I could do this, after all? What did I really know about gardening anyway?
And, of all the crops planned for my new garden this year, the peas were the one I was most looking forward to. I don’t believe I have ever in my life tasted fresh shelled peas, even from my parents’ or grandparents’ gardens, and those in the know were telling me how scrumptious they are. My parents confirm that they had never had much interest in growing peas. Mom, a now-retired nurse who worked outside the home most of her life, didn’t relish the prospect of shelling them, so peas simply were never planted. Maybe because of that, growing peas has become my gardening holy grail.
And I may have been too hasty in blaming my sizable loss of peas on rodents — whether squirrel, rabbit, ground hog or mouse. Even after I had my fence in place, I continued to suffer additional losses. Further consultation with more experienced gardeners appears to have solved the crime. The likely culprit was probably cutworms. At least, that’s the conclusion I’ve come to via the circumstantial evidence.
Cutworms are scary creatures. The larvae of several species of night-flying moths, they come out at dark and attack. Some of these night-time marauders are solitary vandals, who sever the plants just below or above the soil’s surface, at times dropping the felled stalk into their burrows so that the vegetable appears to have vanished into mid-air. I have seen the work of these nasty fellows, and it’s downright spooky.
Others work in groups, like armies of juvenile delinquents, rampaging across the landscape in legions, eating the tops off of plants and then marching on to their next hit. Still others are silent stalkers, feeding off the vegetable’s root so that the plant above appears to wither away overnight. If you want to know more about these covert criminals, I recommend this informational fact sheet from the University of Rhode Island.
I have witnessed apparent attacks from every variety of these hoodlums, assuming they are indeed the culprits and not the rodents. (But I’m still keeping an eye on those guys too. They’re devious devils too, and I don’t trust them a bit, even though I’m letting them off the hook for now.) It turns out that the plastic protective cloches that I had made from one- and two-liter bottles offered pretty good (although not 100 percent failproof) protection from most of the cutworms, with the exception of those that attacked the roots. Once the cloches were removed, the peas were 100 percent vulnerable.
More than a week has gone by now since the initial attack. I have noticed that peas have an incredible will to live. Those that were left with any leaves at all have sprouted new side shoots and may actually continue to go on to bear some harvest. I’m glad I didn’t dig them all up right away in despair. It’s too soon to tell, but I’ll be sure to report later on if my wounded go on to bear a harvest.
I’ve moved all of my survivors close together to share a trellis, as it no longer seems worthwhile to run a supportive fence all around the periphery of my rather large garden plot, as I originally had planned to do. The downside to moving my peas around is that I am no longer sure which are the snow peas, which are the sugar snap peas and which are the shelling peas. They are now all mixed together. I supposed I’ll know if any of these poor survivors ever provides me with a harvest. At this point, I’ll consider myself lucky if there’s enough for a meal or two.
The stubby wounded plants are once again protected with cloches. Those that are tall enough to reach their trellis are wearing protective aluminum foil skirts, shiny armor to ward of the preying cutworms that may dare to attack from above.
Evidently, cutworms are particularly troublesome in a garden’s first year. The moths lay their eggs in grass and weeds in the late summer and, after hatching, the larvae feed until cold weather, when they overwinter in the ground beneath. Frequent cultivation of the soil helps to either push the larvae deeper into the soil or to lift them above the soil, where they are exposed to predators. By moving my peas, I was able to unearth and kill a number of the nasty demonic predators. By the end of June most of these devils will have risen from their Hades beneath my garden, transform themselves into moths and take flight, leaving eggs in grassy areas and hopefully away from my garden plot.
Suddenly, gardening feels like warfare, with the enemy coming at my charges from above and below. This world is not a safe place for vegetables, to be sure. This is crunch week in my garden, as I race against time to get everything planted. We tilled the soil in March, and now as I’m sowing row after row of my summer crops, I’m also turning over the soil in search for more of these subterranean terrorists. I’ve got my eye out for them now. I’ll get ’em, just wait and see.
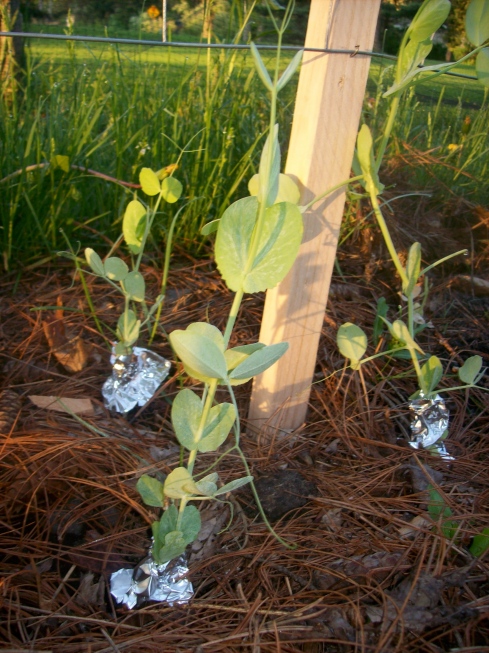
My pea survivors are armed for battle. This is war.



Recent Comments