You are currently browsing the category archive for the ‘greens’ category.
All summer long, I kept asking myself, “What’s with this place?” The soil here just wants to grow things. Everything I plant takes off in amazing ways.
Those eight zucchini plants — planted more than a month late? Every time I turned my back, there were piles of zucchini waiting for me the next time I wandered through my garden. I’ve frozen 24 cups of grated zucchini and fed relatives in two states. And, even now, there are another half dozen growing away in late September. Eight zucchini plants are more than enough.
Those strawberries that I transplanted? They’ve all taken root, and I expect great things from them come June. In the meantime, growing in their midst is a plot of spinach, Swiss chard, bok choy and arugula — thrown in as an after thought, an effort to start cleaning out my stash of old seed. Planted about a month ago, all are ready to eat right now. I’m eating as fast as I can, and the relatives are doing their part, but let’s just say our little pet rabbit is dining like royalty as well.
But the real proof that this soil is rich, rich, rich? It’s the sunflowers growing outside my bedroom window. Huge! Leaves like sheets of newspaper and heads the size of serving platters. One stormy night a few weeks ago, the wind was slamming these things against the side of the house and it sounded like bodies hitting the walls in the dark of the night. Very, very creepy.

I’m not exaggerating. Here’s one that fell to the ground yesterday, drying out for the before-mentioned rabbit’s winter fare. (That’s a standard-sized dinner plate on the table next to it.)
With a little investigation, I may have learned this land’s productivity secret. My dad tells me that some time ago one of the tenants kept horses for several years on this side of the house, right where I’ve planted my garden. Years of manure curing in the prairie grass. I can’t wait to see what this ground yields next year.
One of the best vegetables I have discovered since starting my garden several years ago is Swiss Chard. I had seen it before in the produce section, but usually it looked so battered by the time it reached my supermarket that I had always found its appearance unappetizing.
Well, that problem is solved when it grows right here in my garden. Like other greens, it doesn’t require a ton of root space, and it seems to thrive in a bit of shade with sun early in the day and late in the afternoon and evening. This has made it a good crop for the back part of my garden, in what I call the high shade of a maple tree. The lowest branches of the tree are about twelve feet from the ground, which allows enough light to reach my crop of greens.
I have found that Swiss chard can be used in just about any recipe that calls for spinach. I have an enormous bounty of chard this year, and I’m using it in huge amounts nearly every day wherever I can think of something to add it to. I made a large pot of lentil soup last week and added about 2 quarts of fresh chopped chard to 2-1/2 quarts of vegetable broth with a large onion sautéed in olive oil and a quart of cooked lentils, salt and pepper — delicious, hearty and packed with nutrients. I’ve also added sautéed chard to a wild rice mix with baby peas and pecans, with amazing results.
For me, Swiss chard seems easier to grow than spinach, and evidently it grows well even in the hot months, as long as it is in the high shade that I previously described. In fact, we had a full month of mostly 100 degree temperatures this year — unusual here in northern Indiana — and the chard seems to be thriving when all of the other greens have failed. It doesn’t tend to bolt when spinach or lettuce does. An eight-foot double row planted in the early spring feeds us from mid June until early December, as long as we don’t get a heavy snow-fall or a very hard frost before then.
Swiss chard contains a high amount of flavonoid phytonutrients, including kaempferol and syringic acid. Kaempferol is heart-healthy, and syringic acid appears to help regulate blood sugar. Chard also contains high amounts of vitamins K, A, and C and the minerals magnesium, manganese, potassium and iron. One cup of cooked Swiss chard provides 10 percent of your daily calcium needs as well.
While Swiss chard is similar to spinach and can be substituted into most recipes calling for spinach, it has a somewhat more mild flavor than spinach and, for this reason, may be more appealing to people who find they really don’t like spinach that much. And if you, like me, can’t find good Swiss chard in your supermarket, it’s easy to grow in pots on your porch or balcony. The leaves and stems are colorful and attractive and are a pretty addition to any container garden.
Last frost date in my region is May 15. That is a date locked into the DNA of all serious gardeners. This is when we can safely sow our seeds and our tender seedlings outside, into the garden beds that we have lovingly prepared for them.
My sun porch is anxiously waiting for that date. Ten more days. My tomatoes are waiting as well. As we get closer to May 15, I’ll be checking weather forecasts to see if I might fudge a little and set them free a few days early. But ten days . . . that’s a little risky.

Tomatoes are the primary seedlings in my sun porch, waiting for planting in the next week to ten days.
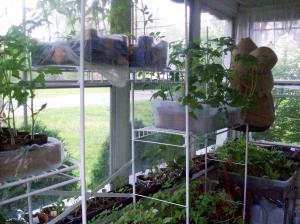
Last spring we actually had frost in late May, so this year I’m a little worried about rushing my plants outside too fast. I always start twice as many seedlings as I actually need, so that I have back-ups in place in case the worst happens. But these tomatoes, the ones I started in late February, have gotten large very quickly. I don’t know how long I can hold them back without causing them distress. I expect many of them will find homes in buckets and other large containers as I wait to see whether or not I should be giving them away to family and friends. And I’ve purchased row covers to use in the early weeks outside as another precaution for my tomato crop.
Thankfully, I have nearly finished putting in my very ambitious brassica garden. I saved my old station wagon, retired last year, to use as a green house this year, and it performed admirably.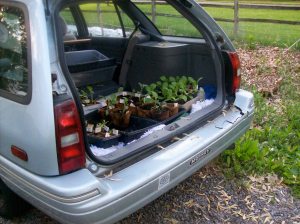 At one point I had more than a dozen large flats of brassica and lettuce and greens seedlings growing enthusiastically inside this defunct 1993 Mercury station wagon, awaiting transplantation into the garden. Except for the bok choy and my back ups, everything is outside now. Among my brassicas, I have hearty plantings of broccoli, cauliflower, kohlrabi, cabbage and Brussel sprouts, all under cover, not only protected from the cold, but also those dreaded cabbage worms that I found so discouraging last year. The floating row covers will stay in place for the entire season, right up until this spring planting is ready for harvest.
I can’t believe I once thought a garden starts in May. This year, my garden began in the middle of January, when I bought the seeds and started planting my seedlings, starting first with the herbs, which need the most time to get established. Then came the tomatoes, then the lettuces and greens, and finally, in March, the brassicas. Last, I began planting the marigolds and nasturtium, the flowers that will help protect my garden from pesky insect infestations. And, in early April, the cold-tolerant greens began moving out to the garden and I planted my peas. In late April, the brassica seedlings were added.
Now we wait for May 15.
I’ve been so busy putting my cold-tolerant seedlings into the garden that I haven’t had a chance to brag about the veggies I sowed during the winter in containers and have been enjoying for several months.

Greens grow very well in containers, and many greens, such as this spinach do thrive in cool temperatures. I started this spinach and cilantro in December, it sprouted early in January, and grew quite well under lights until I moved it to my sun porch in early March. On warm days, I moved it outside. On the few nights of hard freeze, it came inside into my living room. Today, in late April, it sits virtually every day and night outside on my front steps.
By mid-March, I began harvesting a couple of times a week — not much, but enough to add to omelets here or soup there. Now it’s all I can do to keep up with what I’ve planted. It’s been lovely, and next year I intend to plant several containers — of lettuce, Swiss chard, arugula, cress, and, yes, spinach.
Greens don’t need much root space. My spinach is growing in a plastic sweater box. I recommend using prepared potting soil, to avoid aphids, and of course you must be careful not to overwater. But it is a very inexpensive project that anyone can do with little special equipment. Once the seeds have sprouted, fluorescent lighting is required and should be only a few inches from the green seedlings. A desk lamp or two with a couple of those energy-saving fluorescent light bulbs are all you need for this. A sunny spot is useful, but not necessary. (Mine grew in my basement.)
I can’t wait to try this again for this fall. Perhaps I can keep a box of greens or two going all winter long.
Before I started my garden last year — my first year as a vegetable gardener — I didn’t realize there were an abundance of veggies that could be moved out to the garden early in the season, once the soil can be worked. Instead, I thought I had to wait until after the last frost date here in northern Indiana — May 15 — before my garden could start to take shape. As a result, my garden got a late start. This year, I moved in the opposite direction and have tried to push the envelope, so to speak, to see how early I could get away with planting my salad greens. I began putting out Swiss chard and spinach seedlings in early April, which have taken advantage of the frequent spring rains. (Of course, I had plenty of back-up seedlings in case my experiment failed.) I expect to begin eating from these earliest plantings within a couple of weeks.
I also planted lettuce seedlings two weeks ago. These were not quite as successful. It looks like I lost about half of my plants, although I’ve been left with plenty for a first planting, and of course I’ll be adding more soon. I’ve decided that my lettuces should be the first seedlings I start each winter, so that they will be plenty big with good root growth to survive the April temperatures. I don’t think it would be unreasonable to begin planting lettuce seedlings in late January.
While we’re on the subject of starting seedlings, I’ve decided that I really like using peat pellets for lettuce seedlings, as well as seedlings of other delicate salad greens. They are exactly the right size for these particular vegetable seedlings, and the pellets are much easier and faster to plant once the greens are put out into the garden. I have about twice as many seed failures using pellets instead of traditional potting soil and peat pots, but the unsuccessful pellets can be replanted a second time when the seeds don’t sprout, so they aren’t wasted. 
I discovered last year that lettuce and other salad greens do very well in high shade. I have mine in the section of the garden that is shaded mid-day by several old maple trees. They don’t need as much root space as other vegetables — about four inches is plenty — so the roots of the tall trees nearby don’t interfere their productivity. And the soil beneath the trees is rich and loaded with decades of organic material that has fallen from the trees. Yet there is plenty of light in the morning to keep these plants happy and growing. Additionally, this particular section of my garden lies along the south side of my garage and benefits from the protection this structure offers during frosty nights.
The only difficulty of growing near the trees is that I suspect they are a source of aphids. As I did last year, I cover my lettuce seedlings and the young seedlings of other salad greens with cloches made from two-liter bottles that I have been saving since last summer.  This protects them from the cold, rabbits (I haven’t yet made needed repairs to last year’s fence), and insects. I’m also going to try covering the paths between the rows with plastic (last year I used dried leaves and pine needles) to see if this inhibits insects from spreading to my greens once the temperatures have warmed and I’m forced to remove the cloches. Additionally, I plant my greens in double rows, and I surround them with plantings of known aphid repellants — right now, those are onions and garlic, as these members of the allium family also are tolerant of cool temperatures. Later I will add cilantro, basil and anise.

Now that my greens and my peas are in, and I still have one week remaining in April, my goal next week is to move my sturdy and thriving brassica seedlings outside. This year I should have half my garden planted before we ever get to mid-May.

Lettuce from my garden
We’ve been enjoying lettuce from our garden for two weeks now, and my girls and I have each consumed large salads at least every other day since then.
When I made the decision to plant lettuce earlier this spring, I did so largely because of the shadiness of the plot we had prepared. Situated in the back southeast corner of our lot, this garden plot measures about 12 by 15 feet and has three large trees nearby, one on the south, one on the west and one on the north. This also means that the ground has roots beneath the surface that hinders good soil preparation more than six inches down. The plot gets full sun from sunrise through about 11 a.m. and then filtered sun for most of the day after that. The south end of the plot gets full sun again in the late afternoon and evening, so I set aside a third of that end to see if I could grow tomatoes there successfully. The north third I planted with baby spinach. In the middle, I planted the flat of lettuce seedlings that I started inside in mid-March, as well as two other flats that were started later.
The lettuce (Summerlong Gourmet Mix, W.Atlee Burpee & Co.) is composed of six different tender green or red lettuces: Four Seasons, Lollo Rossa, Buttercrunch, Craquerelle du Midi, Black Seeded Simpson and Salad Bowl. Their flavors are on the mild side, which is most popular in my household. Once I complete this 1 gram package (which is likely to take all summer), I am going to have to buy individual packages so that I will know which is which. There is one that is so tender it practically disintegrates in my fingers when I handle it. But that one is the one with the most appealing flavor, so I don’t intend to avoid it, but simply find strategies for handling it.
I put the seedlings outside into the garden in mid-April and covered them with cloches made from soda bottles. Recently, I planted another row directly into the garden plot. I’d like to know if there is an advantage sowing the seeds into the flats.
The cloches are wonderful at keeping out insects and protecting the lettuce from rabbits, as I have not yet fenced off this plot (although that is on my to do list for the coming week). They aren’t fail proof — yesterday I found my first slug — but it’s very nice to harvest lettuce with lovely, flawless leaves. One small downside is that dirt & debris often falls from the cloches as I remove them onto the lettuce leaves, but that easily rinses away in the cleaning process. Another aspect of the cloches that has been a benefit is that I believe the plants stay warmer and thus grow faster inside the plastic. However, as the season heats up, that could turn into a detriment and the cloches may have to go to prevent frying my greens.
The first time I harvested my lettuce greens, I was dismayed to find that when I rinsed them in mass in a colander the way I clean my store-bought lettuce, their leaf structure is far too tender for the weight of the water, and they all went limp.
Thank goodness for the Internet and the gardening friends I have made on Twitter. My friend Dan (@cityslipper) at Your Home Kitchen Garden clued me in to his technique of allowing the lettuce to float in water and then rinsing the individual leaves one-by-one. This man knows what he’s talking about. Doing this solved my problem. Now I have a dedicated pail that I fill with water and put the cut leaves into it as I harvest them. I then rinse the lettuce leaves individually on an outside table with a weak stream from the garden hose before spinning them dry. This method is very efficient, and I can quickly harvest and clean a salad large enough for the three of us in a matter of ten minutes, if I don’t dawdle.
So far I’ve been able to cut the outer leaves of the lettuce plants and leave the inner one or two small leaves on the stalk. By doing this, the plant continues to grow and provide additional harvests. I haven’t yet exhausted any of the plants, so I can’t tell at this point how long I’ll be able to do that. But I plan to put in additional new rows of lettuce each week to make certain that my family and I will continue to enjoy these amazing greens all summer long.
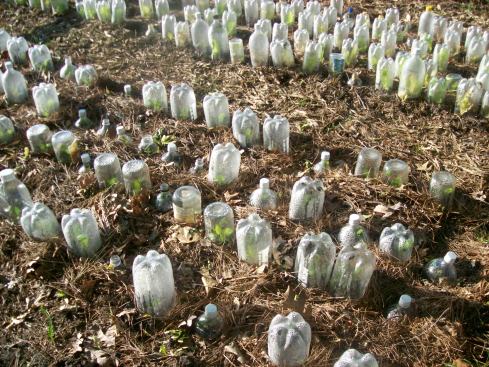
They aren't pretty, but they get the job done.
Several of my readers have commented on my cloches, made on-the-cheap from various bottles that largely have come from my household. By and large, these are one- and two-liter soda bottles. We had an entire winter’s supply of plastic bottles in our garage, awaiting recycling, when the idea came to me that I might be able to use them in my garden.
(Actually, if truth be told, we really don’t drink that much soda from bottles. I, however, love seltzer water, which I buy in two-liter bottles, and average about one bottle a day, whereas my daughters are fans of Walmart’s flavored seltzer, which comes in one-liter bottles. Between the two of them, they probably average eight to ten bottles a week. Yes, that’s a lot of plastic, but our water here is very bad quality, and even purifying it doesn’t seem to remove the bad flavor.)
Initially, I cut the bottles roughly about one-third down from the top of the cap. Two-liter bottles are 12-inches tall, and using a utility knife I cut the bottles at the point where the label ends, somewhere between 7-1/2 and 8 inches from the bottom. I cut the 10-inch tall one-liter bottles in about the same place, two-thirds up from the bottom, along the edge of the label. Then I’d remove the labels and use the bottoms. Later, when I ran out of bottoms, I realized that the tops also could be used with the shorter seedlings.
When I place the bottles over my seedlings, if the surrounding ground is soft, I can push the bottles down into the soil an inch or two, which secures them from toppling or getting blown about in the wind. We have had some windy days, but I have only had a couple of bottles desert their posts. With the fence around the garden — which is really not fencing at all, but deer netting secured to stakes — none have blown away to liter my neighbors’ yards. When I covered the spinach seedlings, which had sprouted in place in their garden setting, I soon learned to loosen the soil surrounding them with my hand spade before attempting to secure the bottles over them. Otherwise, the flimsy plastic of the bottles curls under and the cloches don’t stay in place.
One of the reasons I really like the cloches is that I can pile up the mulch fairly thickly around the plants and close to each individual plant without smothering the seedlings underneath. As the mulch settles into place and weathers down after steady rains, it forms a nice ring around the plants without actually touching the stems. My regular readers may recall that I have been fighting unusually high pH levels in my soil — it measured above 7.5 when we first turned over the soil in March — and after an initial application of aluminum sulfate that brought the pH down to just under 7.0, I have been attempting to maintain and perhaps lower that a bit more with pine needle mulch, graciously provided by my next-door neighbors. The cloches help prevent the needles from actually touching the seedlings, thus avoiding any possible burning from their high acid content.
The cloches also have very nicely protected the plants from rabbits, mice, raccoons, squirrels, ground hogs and all of the other Rodentia that prey from above the soil. Additionally, they had been very effective against the much-despised cutworms that strike from above — that is, of course, until the cloches were removed. They didn’t seem to protect them from underneath though, and the cutworm species that attacks the roots were able to achieve their mayhem unhindered, even with the cloches in place. I’m hoping that I will not have the problem with cutworms in subsequent years as cultivation alone seems to work against them as time goes on.
The two-liter bottles, by virtue of their larger circumference, fit over larger peat pots. I have sprouted my seedlings in 2.5-inch and 1.75-inch biodegradable cells, and the one-liter bottle cloches do not fit around the larger cells. So I have used them on the seedlings in the smaller cells (the lettuce and spinach, for example) and saved the two-liter bottle cloches for the seedlings in the larger cells. My lettuce plants have gotten so large now though that I am transferring the larger cloches to them as they become available. I expect I’ll soon be harvesting some of the lettuce, perhaps within the week.
However, I find I actually prefer the smaller one-liter cloches whenever I can use them. I have found that the flimsy plastic on the larger bottles curls under with age, which makes it harder to push them down into the soil. Loosening up the soil around the small plants first before pushing in the bottles over them helps prevent the curling, but in time the plastic eventually curls anyway. I extend the life of these larger cloches by trimming off an inch of the plastic when it starts to curl, but they will end up in the recycling bin before the season’s end, I’m afraid. The smaller bottles, on the other hand, will likely survive several seasons.
As I’ve needed larger and larger bottles, I started cutting off the bottoms of the bottles instead of the tops. I only take off between an inch and two inches when cutting from the bottle, which gives me a couple of inches more in height. This also is actually a better design functionally for cloches. The plastic at the bottom of soda bottles is a tiny bit thicker, which makes for a sturdier cloche. And the tapered top of the bottle allows debris to slide off easily, optimizing the sun that reaches the plants inside. Additionally, I have the option of removing the bottle cap and watering the seedling inside the bottle without removing the cloche, when I think that not enough moisture is reaching the roots directly under the cloche. This isn’t a frequent problem, though. Being able to mulch up close to the seedling allows the soil to retain moisture much more effectively between rainfalls. And, of course, I water with a soaker hose, so as long as the roots are getting what they need, it doesn’t matter whether or not the surface soil is damp.
I’ve been so happy with my improvised cloches that I’ve started using just about every plastic and glass container that would otherwise head straight to the recycling bin. This is what I’ve learned: I don’t like the gallon-sized milk and water bottles. The plastic in our gallon bottles is milky in color and translucent rather than transparent. I don’t think the seedlings inside get enough light or enough water to best sustain them. I love juice bottles the best, especially the large round Juicy Juice bottles. They are made with a thicker plastic, but are big enough in circumference to fit around larger peat pots. And when the bottoms are cut off, I have the same tapered top and the same option of using them with or without the lids.
Any clear glass or plastic container can be put to use in this way. The only limit is the size of the opening. Smaller jars can be used on tiny first sprouting plants and replaced with larger ones as the plants grow. In time, of course, the plants will outgrow them all, but by that time they will have a more solid footing in this world and be less vulnerable to attack. A loss of one leaf on a large plant is not the potentially fatal blow that it means to a seedling. Roots are larger, stems are sturdier, and leaves are more plentiful on older and larger plants.
It was about nine o’clock in the morning, mid April with the sun barely showing from behind the clouds. There was a look of soft rain in the gray sky hanging low on the horizon across the horse pasture that loomed off in the distance behind my dilapidated white-washed garage. I was wearing my black-and-white zebra stripe flannel pajama pants, my floppy old pink Isotoner slippers, and the black velour hoodie that I had bought a month ago on clearance at Target. I was clean, but without makeup, and my hair was damp from my morning bath, and I didn’t care who saw it. I was everything the novice gardener ought to be. I was going outside to check on my early planting of peas.
My garden sits across my crushed rock-covered drive about a dozen feet from my bottom porch step, still damp from an early morning shower. I briefly glanced at the spinach and lettuce seedlings nestled comfortably in their flats, having been left outside on the porch in the cool night air to prepare them for transplanting later in the week, when the ground was less wet. As I moved down the slick wooden steps, I took care not to fall, holding on to the rail, until my slippers crunched on the surface before me. I stopped and stared over the field beyond the road, where a weathered farm stand still rises from the landscape, a relic of another time when gardens were royalty and their attendants, ladies in waiting. In the distant haze lay the apartments constructed not so many years ago and beyond them my beloved Target and Menards and Kinkos, reminders of the times in which we now live.
My attention was drawn back to my garden before me when I heard the distant shout of a golfer in the course a hundred yards from the rail fence that separates my land from my neighbor’s. I heard also the crack of the iron against the ball, although my view of the play was shielded by the towering pines behind my neighbor’s small sturdy barn. I moved thoughtfully across the drive to my garden plot that follows one car length between the drive and the neighbor’s rail fence and then continues along the full length of my old garage until it nearly reaches the ancient maple that separates the front plot from the smaller garden bed in the back corner of my lot. And then I saw it, and my heart sank and my soul despaired.
My peas. My lovely precious glorious peas. Murdered. Slaughtered. A full botanical bloodbath had occurred while I peacefully slept in innocence inside. Who had done this retched thing? Who had bitten off the tops of nearly half of my exquisite slumbering seedlings? Homicidal rodents, that’s who. Vicious rampaging rabbits. Or gluttonous groundhogs. Perhaps maniacal savage squirrels. How often I had heard their challenging chatter in the overhanging branches of my yard’s many towering oaks. They were not content with the plentiful bounty of acorns that roll beneath my feet with my every step. They had been biding their time, plotting, hatching a plan, waiting for their chance when they could strike and make off with my growing greenery.
And then they struck. They had been watching, those treacherous, sneaky assassins. They had seen me remove those hundreds of protective makeshift cloches that I had so lovingly constructed out of discarded one- and two-liter soda bottles. They had seen me rotate them over to my shorter lettuce and spinach seedlings in the back garden bed, leaving naked and vulnerable my beautiful, trusting and pure-hearted peas now liberated and reaching their faces up into the sky above. And then they struck. When my back was turned.
Sensing their one lucky break — a late afternoon and evening downpour that prevented fickle me from standing out in the cold and wet April air and hammering two dozen fenceposts into the soggy soil and then wrapping my garden behind protective chicken wire fencing to foil their sociopathic visions of pea-seedling slaughter — these crafty criminals struck in the dead of night. And me, having left the night before with my little peas looking like this:
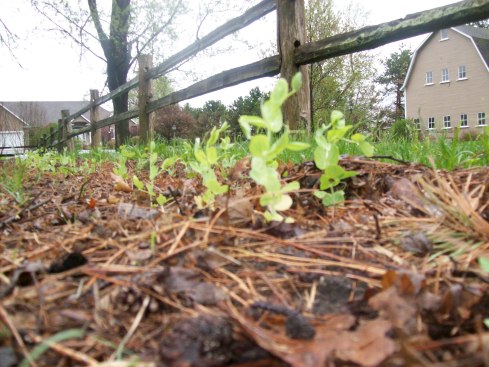
(This photo was taken at 3 p.m. Tuesday afternoon, April 28, 2009.)
. . . Returned the next, following damp morning to see this:
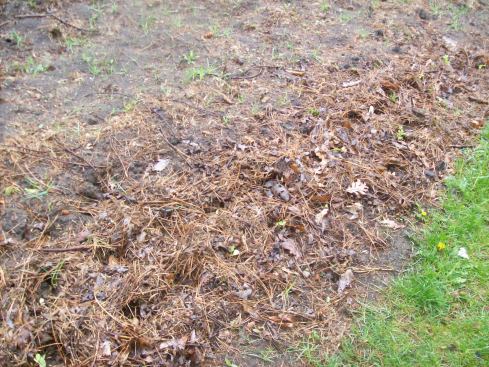
(This photo was taken at 9:30 a.m. Wednesday, April 29, 2009.)
. . . And this:
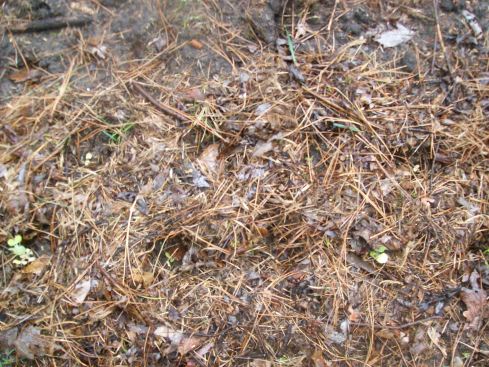
(This photo also was taken at 9:30 a.m. Wednesday, April 29, 2009.)
Is there justice in this world? Is there vengeance to be found? It is a harsh world out there. Evil lurks around every corner. We must be bold and face them down. We must triumph and fight for good. That is why my garden now looks like this:
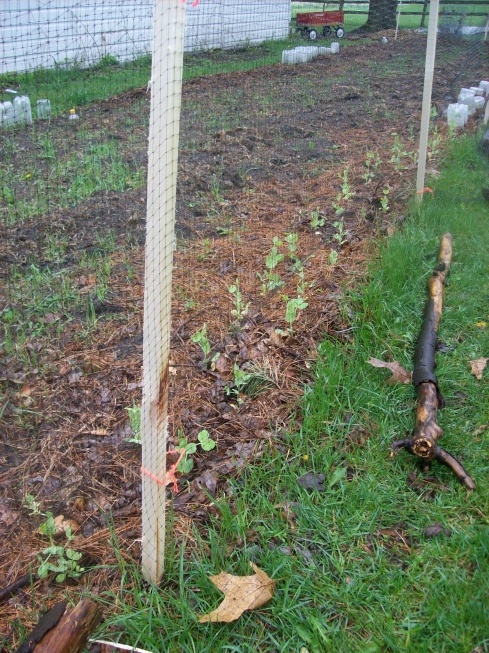
(Photo taken 9 a.m Thursday, April 30, 2009.)
Be brave, little seedlings. I am armed with hoe and rake and shovel and spade, and I will make sure the deaths of your brothers and sisters will never leave my memory. Because I am valiant, and I will battle onward for truth and justice, making certain those hellion horrors, those devious devils never ever have a chance to sink their treacherous teeth into your vitamin-rich, chlorophyllous, photosynthetic flesh again.
And that’s all I have to say about that.

Dandelions growing in my neighbor's pasture
When you are trying to learn a new skill — like gardening, for example — you just never know what useful information you might stumble across in your quest to master this new domain.
A recent encounter with persistent dandelions in my garden beds is an excellent case in point. While searching the Internet for organic remedies for this annoying pest — hoeing and heavy mulching appear to work best — I was astounded to learn that dandelions rule as one of the world’s most nutritionally dense edible greens. They are high in beta-carotene, potassium, iron, calcium, magnesium and phosphate, as well as the B vitamins thiamine and riboflavin. I found The Leaf Lady‘s web site particularly informative.
Now keep in mind that I am not a nutritionist, nor am I an historian, only a mom armed with her Mac and a brilliant mastery of Google. But it turns out that the humble dandelion is a European import brought to the States to be farmed in vegetable gardens throughout the colonies when our country was young. Dandelions (from the Old French “dent-de-lion,” which means “lion’s tooth”) kept many a settler alive through tough times and continues to be cultivated and eaten the world over — adored by everyone except us disdaining Americans.
Now I knew dandelions were edible, having learned this fascinating fact the summer before I started high school. That year, my grandfather brought a car full of relatives to our home for an afternoon visit. Among them were his 92-year-old Aunt Alma, who was visiting from Missouri. There were many details about my tiny and unassuming great-great aunt that made an impression that day, among them that she, the youngest of ten siblings who immigrated from Sweden with their widowed mother, married her husband the very day after she met him for the first time (although they had been corresponding for several years) and with him went on to have eleven children of her own. Somehow, during the course of that visit, the conversation turned to food — as it often does when relatives get together — and my Aunt Alma professed an undying love for dandelion greens, much to the amusement of those gathered around her. Given that my Aunt Alma went on to live far past her 95th birthday, I suppose I should not have been so surprised at the healthfulness of her favorite green.

My Great-Great Aunt Alma, lover of dandelion greens
I spent an hour this past Saturday afternoon digging up dandelions out of my yard and garden, then got the brilliant idea of harvesting the greens and trying them for myself. That took the remainder of the afternoon and part of the evening as well. Not only did I have a lot of dandelions but it took a great deal of time to separate the leaves from the rest of the plant, bits of grass and a fair amount of dirt before cooking them. And then the product of my toil — sauteed with chopped garlic in olive oil — was a particularly chewy and bitter dish that we all sampled and no one liked.
So I turned back to my trusty Internet and, once again using Google, found tips for harvesting and for preparing the benevolent dandelion. It turns out that the most tender and least bitter dandelion greens come from the young plants that have not yet flowered. I found harvesting with a pair of scissors the most practical strategy, and by cutting one leaf at a time, I could most easily avoid getting blades of grass in the mix. Many dandelion afficionados advocate soaking the leaves in lightly salted water overnight to remove bitterness and to boil in water before sauteing to soften them. So in my second attempt to prepare my dandelion greens, I followed this advice and found a much more palatable result.
Additionally, I found the tiny flower bud that forms in the center of immature plants, when picked before the stalk forms and sauteed in butter, very tasty. I was able to gather about a cup of these delicacies with about four quarts of tender young dandelion greens in about an hour’s time. All I had left to do was careful rinsing and I was ready to prepare.
I’ve played around with a few recipes, and this is my favorite:
Saute four cloves chopped garlic and one thinly sliced onion in two tablespoons olive oil. Add one teaspoon of curry powder and 2 tablespoons golden raisins and cook, stirring, until the raisins have softened. Add two quarts of young dandelion leaves (which have been thoroughly rinsed, chopped into 1/2 inch pieces, boiled for ten minutes in salt water and then drained). Stirring, saute an additional ten minutes and serve.
Prepared this way, the dandelion greens are tasty, although I am even more fond of the dandelion buds in butter, which has a very nice, nutty flavor, I think.
Note to Mom and Dad: If you read this, do not send money. We are fine.


Recent Comments